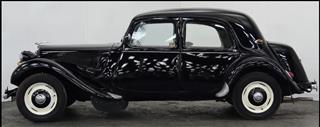

How to fit Seat Belts in a Traction AvantA Reasonably straightforward job for anyone with some basic engineering skills. Now I know some owners don't want to fit seat belts and I was in that camp however, being a left hand drive car it can be a bit disconcerting for a front seat passenger when whizzing down twisty country roads, plus my Son In Law would not let my Grandson travel in the Traction without seat belts so bit the bullet and decided to fit them. I bought 2 X Universal Cream 3 Point Seat Belt. Extra Long. Approx3.5 Metre Webbing. E4 Rated from eBay seller 140351charles for £40 the pair, plus a set of E4 NOS 7/16 UNF seat belt bolts and washers along with a pair of Seat Belt Brackets from another eBay seller, torridonian. Decided to start with the top mount fitting onto the door hinge bolt as described in previous Technical guides in Traction Owners Club Magazine, Floating Power, Vol 35, issue 4 Now simply putting an adapter on the protruding bit of M10 thread remaining of the hinge bolt did not provide a very secure fitment in my opinion so I decided to remove the existing hinge nuts completely and make my own extended ones which act as adapters to take Standard 7/16 UNF Seat Belt Bolts as shown in the diagram below.
I bought some 3/4AF Hexagon bar from eBay and using hand tools including a hacksaw, file, drills and taps, created 2 new hinge bolt nut seat belt adapters in just over an hour. Anyone with basic DIY skills could do the same. Using the new Door Hinge Nuts shown above you get a far more secure mounting point. The overall length at each side did differ slightly due to the shape of the 'B' Pillar cover and will be shorter than that shown on a pre 52 car as the trims are different so these should be measured individually on the car they are being fitted to. I did hit the 1st undocumented problem once I removed the 'B' Pillar trims. Originally the top 'B' post covers were clipped into place using the same trim clips as the door cards on post July 52 French cars. The 'B' Post Inner Trims However on my car someone had previously drilled them to be held in place with a simple screw. On removing the cover I could not see the hinge bolt because of the plate that the cover trims clipped into. So, I had to cut the plate to get access to the hinge bolt. It wasn't simply a matter of cutting the wood away though, I had to cut through the metal plate where the trim clip would have originally fitted..... Once done in situ, I could then fit the 10mm >> 7/16th UNF adapter to which the top belt mounting would be bolted. If it only had been that simple though, the internal bracket for the trim clip partially covered the 12mm hole so I had to modify that slightly as well.
The Other Mounting Points Then it was onto the centre stalk mounting plate. Given that the floor isn't made of the thickest steel and after talking to James Geddes, I decided to make a bolt through mounting plate. You also have to remember that a strengthening 'V' section runs slap bang along the floor, fore and aft, so care needs to be taken where to drill the holes. James fortunately had a spare new floor pan, so after measuring up, 10 cm was found to be the ideal bolt centres to span the V strengthener under the floor, whilst not being too wide to miss it completely.
To get them attached reasonably flush, I had to drill a 26mm hole in the inner sill so that the nut went through. That again wasn't so straight forward as there is a bar at the bottom of the B pillar between the sills so I ended up having to cut a hole cutter short to get it to for through far enough. Now here was the tricky part, welding them in..... I sprayed the interior of the sills with Dynax S50 rather than Waxoyl for it's superior rating 6 years ago after the bodywork was restored. The welding was initially tried using a TIG welder, but the heat created made the Dynax liquify and start to burn!!!. So it was off to plan B and use a MIG welder with small passes, after using a cheap dry powder extinguisher as a pre treatment with a C02 extinguisher as a standby. This time all went well, if slowly so if your restoring a car and think you may want to fit seat belts at some point, do it before applying any rust proofing agent. Now to attach the 'lap' part of the belt I had to make 2 X extension bars 110mm long with 2 12mm holes at 75mm centres from that same 30X4mm steel stock. These went onto the reel mounting bolt behind the reel at a 45 degree angle so that when fastened, the belts pulled straight in line. The left hand image doesn't show that but there is a mounting bush on the bolt that lets the belt move around in line when fitted.
Once all the plates were attached, the carpets went back in and the belts were finally fitted Total cost of the parts and welding, £84.00 plus my 'labour' The Fitted Seat Belts:
Last Update: 23rd January 2017
|
|
OSL282