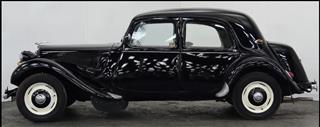

Traction Avant 'Perfo' Engine RebuildIt really was worse than we thought! All summer 2013 when using the car over 1,600 miles, it had a heavy oil leak which we thought was the flywheel end, crankshaft seal, so it was decided to pull the engine and gearbox out over the winter to 'investigate' 
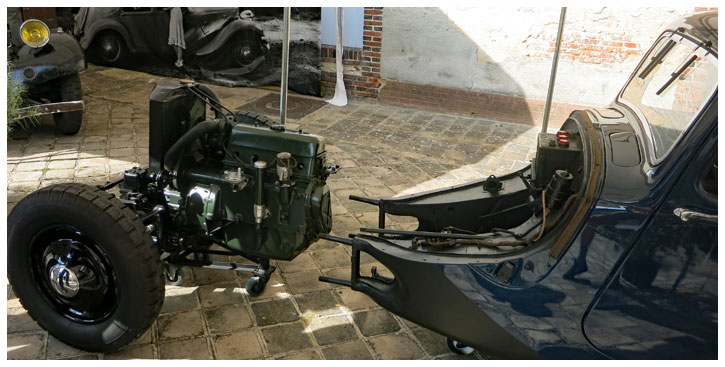
As can be seen in the image above, the complete drive train can be removed as a unit with engine, gearbox and front suspension but james opted to just remove the engine and gearbox. The Stripped Engine
The Engine Rebuild Once the crankshaft was removed everything else was checked out and whilst still serviceable it was agreed that the pistons and liners should also be replaced as there was signs of wear on the pistons and a lip on the bores. It was decided to stick with standard 'flat top' pistons as the alternative 'domed' pistons from the 11D engine increase the overall horsepower. Whilst that may make the car more responsive, it's adding increased load to the crankshaft, clutch and gearbox and in standard form, the 11BL is fine to drive. After a discussion with Traction Specialists, it was also decided that all the white metalled bearing should be replaced with modern 'Shells' as there are very few people left who can apply white metal to the specification required, plus the cost difference was negligible. Using 'Shell' bearings for the big ends also meant updating the con rods to those used in the later 11D engine, so an original matched set of 11D conrods were obtained from a long term Traction enthusiast, Andy Burnett near Aberdeen. With a conventional engine you would rebore the block and fit new pistons and rings but the Tractions Perfo Engine uses replaceable liners. The other main item to consider was the oil pump given that all the bearings were damaged, it was decided that it should be replaced with an upgraded one. An original pump gives circa 30 psi at 750 rpm, an upgraded oil pump from Roger Williams gives 50 psi at 1,000 rpm. One of the downsides of this we later found out is that increasing the oil pressure and flow meant that we had an oil leak from the gearbox end 'oil retainer' as it was having to work beyond it's original design specification. However it's a small price to pay and simply meant buying a large drip tray for the garage floor! Thankfully the Timing Chain and sprockets are fine and the distributor is a new 'electronic' one and the fuel and water pump are both OK as well as the camshaft and as the cylinder head has had the exhaust valve seats hardened it was agreed that would be simply refitted. I tracked down and ordered all the required parts (most came from Chris at Traction Owners Club Spares) and took the crank and conrods for refurbishment. The crankshaft was duly reground to -0.5mm for the mains and -0.75mm for the big ends after the Xmas break by Ron at Northern Rebore in Newcastle, who also fitted and reamed new 'Small end' bushes to the new conrods. There was no option but go to the sizes indicated because of previous engine repairs. We chose Northern Rebore as they had an original 'Prince' grinder so could actually grind each bearing journal individually. Modern machines that were available at other workshops could only grind all the bearings at the same time to the same tolerance. A lot of other small parts were needed like thrust shims, lock washers, gaskets etc. etc. so whilst Traction Owners Club Spares supplied the new 'Shells', Pistons and Liners and gaskets, some other parts like crankshaft shims and cylinder seals came from Jose Fransen in Belgium and a box of assorted copper washers from an eBay seller. Once we had everything required in place James started the actual rebuild on 20th January First job was to fit check that the crankshaft bearings and new bearing shells were OK, which they were, so then the new 'cylinder liners' were fitted and the block filled with water, then left 24 hours to ensure there were no leaks.
In the left side image below you can see that the crank, pistons and timing chain are all fitted. You can also see in the picture that the piston 'wet liners' are held down with temporary bolts. This is very important as turning the crankshaft can loosen the seals on the liners. Also, setting the actual height of the liners above the block is vital to allow the cylinder head to compress the head gasket and make a tight seal, if it's not correct the gasket can fail within a few hundred miles. The other 2 images show the main flywheel end bearing keep and oil retainer which was the source of the oil leak that meant the engine had to be removed. It turned out that the outer oil retainer (image on the right) face was not even, so was not doing it's job. James had to file and dress it to ensure that it was flat and mated properly to prevent any future leak (well that was the theory anyway, in practice the uprated oil pump had other ideas.....)
February 8th 2014 saw the engine and gearbox going back into the car. The flywheel central bearing for the gearbox and the clutch release bearing were both replaced prior to the gearbox being bolted to the engine before they were lifted back into the car as a unit (as shown below) because there is no room to fit the gearbox later. The following day, the cylinder head was fitted, however instead of replacing the cylinder head bolts, we used a set of 'studs and nuts'. Why? well the head had been re faced (skimmed) when the valve seats were replaced and there is a known problem where the 'bolts' can bottom out in the holes in the main block and cause either the block to crack, or the threads to be stripped. Using studs you can negate that happening. Then distributor, fuel pump were all added, 4.5 litres of Castrol XL30 was used to fill the sump, the fuel system 'primed' and the engine fired up and checked to ensure that the timing was OK. The radiator and fan was not fitted at that stage so it was only a short test, but it fired up after a couple of turns of the starter. (the image on the right shows the engine just prior to it's 1st start). Once that 1st test was successful, the fan and radiator were fitted and filled with water and the engine restarted and run up to temperature. At which point the cylinder head was then re torqued and the valve tappets reset. The plan is to complete the engine and gearbox installation, fit the front grille and bonnet and bring the car back home to 'run in' the engine. How long that will take depends an awful lot on the weather as the car needs to go out on the road to do that.
Given the overall cost of repairing the engine, I decided that it would be sensible to add an Oil Pressure and Water Temperature Gauge to the car (French built Tractions historically never had them) to forewarn of of any potential problems in the future. The car was delivered back on 10th February with just a couple of things to finish i.e. running the new pipes for the new gauges through the bulkhead which I duly did the same afternoon and run the engine in for 500Km before a further oil change, but that may take some time looking at the weather forecast. Managed to get out and about and during the initial running in over 200 kms, the water pump developed a leak, so that was changed and a new fan belt sourced and fitted. Hopefully that is everything now! The engine overhaul completed:
The total cost of all the work including parts, postage and labour: £2,631.35 500km later and the oil has been changed for the 1st time during 'running in' and so far, no major leaks. Top Tip: with a small bodied Traction (Light 15 or Legere) when the engine is out of the car, have the starter motor thoroughly checked out. It now has a 12 volt starter motor (fitted in a field in France) and the week we got back, a new coil and plugs to aid 'hot' starting were also fitted along with a bargain new fuel tank sender unit (20 euro at the rally autojumble) so the fuel gauge works at last. Below are some pictures of the car in France.
Last Update: 7th March 2019 |
|
OSL282